User login/registration component for ProcessWire using the FrontendForms module.
FrontendLoginRegister
A module for ProcessWire CMS to integrate a user registration/login functionality based on the FrontendForms module. This module creates pages and templates during the installation for faster development.
⚠ This module is early Beta stage - so be aware of using it on live sites!
Requirements
- ProcessWire 3.0.195 or newer
- PHP 8.0 or newer
- FrontendForms 2.1.52 or newer: Please download and install it from the modules directory first.
- CronJob: Will be installed automatically, if not installed
- TfaEmail: Only if you want to use 2-factor-authentication with email and code
Highlights
- "One-click" integration of a user login/registration system without the hazzle of creating all pages and forms by hand
- "One-click" switch between login or login and registration option
- Double opt-in with an activation link on new registrations
- Option for automatic sending of reminder mails if account activation is still pending
- Option for automatic deletion of unverified accounts after a certain time to prevent unused accounts
- Option to use TFA-Email if installed for higher security on login
- Mutli-language
- Select if you want to login with a username and password or an email and password
- Select the desired roles for newly created users
- Select, which fields of the user template should be displayed on the registration and profile forms (beside the mandatory fields). Fields and order can be changed via drag and drop functionality
- Offer users the possibility to delete their account in the members area using a deletion link with a time expiration
- Customize the texts of the emails that will be sent by this module
- Usage of all the benefits of FrontendForms (fe. CAPTCHA, various security settings, support for UIKit and Bootstrap framework, ...)
- Support for SeoMaestro if installed
- Lock accounts if suspicious login attempts are made
- Allow users to upload a profile image for their account
- Support of Ajax form submission
- Support for following 3rd party mail modules: WireMailPostmarkApp, WireMailPostmark, WireMailSmtp, WireMailPHPMailer
Table of contents
- Installation
- Configuration
- What happens during the installation process?
- Sending emails
- Customizing email texts
- Security features
- Support for custom user fields
- Multi-language
- Show body text after successful form submission or not
Installation
Please download and install FrontendForms first. You do not have to change configuration settings in FrontendForms to run this module. Only install it. Later on, you can change some parameters to suit your needs, but it is not necessary to get this module working properly.
Download the module, rename the module folder from FrontendLoginRegister-main to FrontendLoginRegister and add it inside the site/modules folder. Refresh your modules in the backend and install this module as usual. Go to the module configuration and make your settings.
Configuration
The FrontendLoginRegister module works out of the box, but it offers the following configuration:
Login or Login/RegistrationSelect if you want to offer only login or, in addition, the possibility of registrationUserdata for loginDecide whether to log in with a username and password or an email and passwordRedirect after loginYou can select a page where the user should be redirected after successful loginTFAYou can enable 2-factor authentication with email (TfaEmail) if it is installed.Sending reminder emailSet the time in days after which a user should be reminded to activate his account if not verifiedDelete unverified accountsSet the time in days after which an unverified account should be deletedSet rolesSelect which role(s) should be added to a newly created userSet form fields for registration formSelect which fields of the user template should be displayed inside the registration formSelect type of privacy noticeSelect if you want a checkbox field or a text to inform the user that he has to accept the privacy policy by submitting the registration form. You can also disable the privacy notice, but it is not recommended.Set form fields for the profile formSelect which fields of the user template should be displayed inside the profile form (page for user data if the user is logged in)Offer account deletionSelect if you want to enable account deletion for users so that the user can delete his account by himselfSelect email templateSelect which HTML email template should be used for sending emailsFrom email addressEnter the email address, which should be displayed as the sender email address for emailsSender nameEnter the name, which should be displayed as the sender of the emailsSelect using an external mail service for sending mailsIf you have installed 3rd party modules for sending mails and these modules are compatible with this module, you can select if you want to use one of these modules for sending the mails of this module or not.Email TextsYou can customize the text of each email that will be sent by this module using a CKEditor fieldSet image sizeYou can set the size of the user image as it should be displayed on the user profile pageRestrict user image file sizeYou can restrict the maximum file size of the user image for the upload to prevent the upload of huge filesDisable phpini max file size validationBy default, the max file size will be restricted by the max file size as set inside the phpini file, but you can disable it if you wantEnable/disable Ajax form submissionBy default, the settings of FrontendForms will be used for this module, but you have the possibility to change this in the configuration settings of this module
Some settings will be taken from the FrontendForms module settings (enabling or disabling Captcha, logging failed attempts,...) and cannot be set individually in the module configuration of this module globally, but you can always change the form parameters on each template by using the FrontendForms API.
Changing parameters of each form via API inside the template
During the installation of this module, a template for each page will be created and this will look like this:
// This is the code of the fl_registerpage.php which includes the registration form
            echo '<div id="content">';
            echo $modules->get('FrontendLoginRegister')->RegisterPage();
            echo '</div>';
If you want to change some parameters of a form, you can use the FrontendForms API
// This is the code of the fl_registerpage.php which includes the registration form
            echo '<div id="content">';
            $form = $modules->get('FrontendLoginRegister')->RegisterPage();
            $form->setErrorMsg('OMG, there are errors!'); // set a new error message
            $form->disableCaptcha(); // disable the CAPTCHA if it is globally enabled
            $form->setMinTime(10); // set the min time until the form should be submitted to 10 seconds
            echo $form->render();
            echo '</div>';
You can find much more information in the Readme file of the FrontendForms module, so I do not want to go more into detail at this point.
If you uninstall the module, all template files including your changes will be copied to a backup folder inside the root folder of this module.
On a reinstallation, this backup-files with all of your changes will be taken and copied to the templates folder. The backup folder will be deleted afterwards.
So all your changes will not get lost after uninstall of the module. Only if you delete the module completely, all your changes will be deleted too.
What happens during the installation process?
Creation of 8 new user fields which will be added to the user template
During the installation process of this module, 8 new fields will be created:
- fl_activation: Stores the activation code if a new account was created
- fl_activationdatetime: Holds the date and time when the user has verified his account
- fl_reminderDateTime: Holds the date and time when the reminder email was sent
- fl_recoverylogindata: Stores the recovery code if a new password was requested
- fl_recoverylogindatadatetime: Stores the date and time when the recovery code was created
- fl_deleteaccount: This field holds the deletion code if the user wants to delete his account
- fl_deleteaccountdatetime: This field holds the date/time when the deletion code was created. This is needed because the deletion code is only valid for 5 minutes.
- fl_unlockaccount: This field contains the code to unlock the account
These 8 fields will be added to the user template, but they are hidden by default, because they are only needed for the administration of users by this module and not to be filled out by humans. These fields fe contain activation codes, timestamps and so on... nothing you will need to take care about.
Creation of 10 new templates
In addition, 10 new templates will be created. These templates are needed for the pages, that will be created later on by this module.
Please note: You do not have to use the pages/templates for login and registration form created by this module to keep the module working. You can also copy the code of these 2 templates to another template - so it is up to you. All other templates/pages should remain untouched, because the links inside the emails point to these pages!
⚠ But take care that some settings do not take effect when you use your own pages for registration and login. Fe. if you switch from login and registration to login only in the backend and you do not use the built in template for the registration form, it will not have an effect, because this configuration setting takes care of the pages created by this module and not on your custom pages. So the registration form will be still visible in this case.
Creation of 10 templates (one for each page) seems to be a little bit of overload at the first sight. But this makes it all very flexible and customizable.
- fl_activationpage: Template which checks the activation code sent by the user to activate the account
- fl_deleteaccountpage: Template, which contains a form to enter the password to delete the account
- fl_deleterequestpage: Template, which contains a form to enter the password to request a deletion link for the account
- fl_forgotlogindatapage: Template, which contains a form to enter the email address if you have forgotten the login data
- fl_recoverylogindatapage: Template, which contains a form where you can enter your new login data
- fl_registerpage: Template which contains the registration form.
- fl_loginpage: Template which contains the login form.
- fl_logoutpage: Template which contains the session logout.
- fl_profilepage: Template, which contains the profile form if the user is logged in.
- fl_unlockaccountpage: Template, which contains the form to unlock the account by using the password.
Creation of 10 new pages
At the last step, 10 new pages, which use the templates above, will be created under the homepage. These pages are for the workflow to let users register, login, logout, change their profile data and so on.
- Account activation page
- Account deletion page
- Account deletion confirmation page
- Registration page
- Login page
- Logout page
- Profile page
- Login data forgotten page
- Create new login data page
- Unlock account page
Which pages are published and which are not depends on your module settings. If you decide to offer only a login functionality without the option to register, the registration and activation page will not be published.
Support for SeoMaestro
If you have installed the fabulous SeoMaestro module by Wanze, this module set some default values for all pages, that were created by this module to the SEO field too. This is very comfortable, because you do not have to take care of it until you want to change some values. The following values will be set automatically to all pages during the installation process of this module and during the installation of a module translation file:
- title: The title will be added to the SEO field (multilingual)
- description: The description will be added to the SEO field (multilingual)
- priority: The priority for indexing of the page will be set
- sitemap: If the page should be included in the sitemap or not will be set
- noFollow: NoFollow attribute will be set or not
- noIndex: NoIndex attribute will be set or not
Please note: All the default values that will be set during the installation of this module or during the installation process of a language file are my own preferences - you can change them whenever you want later on.
Security features
Double opt-in for newly registered users
To prevent fake registration, every new registered user will get a confirmation email which contains an activation link to verify his account. After the user has activated his account by clicking on the link, the status of this account will change to "confirmed" and the user will be able to log in. At the backend, you can see the account confirmation inside the user table. If an account is confirmed, then the date and time of the confirmation will be displayed in the table.

Just to mention: The verification date will only be added to users which have verified their account via activation link, not to users who were created in the backend.
Completely lock accounts by suspicious behavior
This is for the case if someone tries to log in with the same username or email (depending on your settings) and different variations of passwords.
Example: A user tries to log in with the following credentials using email and password:
- test@example/password1
- test@example/password2
- test@example/password3
- test@example/password4
- test@example/password4
As you can see, always the same email address with some password variations was used to try a login. To prevent such an attempt to hack an account, this module identifies a behaviour where same email address (or same username) was used.
By default, the number of max. attempts is set to 5. So after the 5th attempt, the module checks if a user account with the given email address exists. If yes, then a lock code will be written inside the database to the appropriate user. The user will get an email containing the information about the locked account and a link to unlock it again. If a user has an entry with the lock code inside the database, it is no longer possible to log in to the account until the lock code will be removed by using the unlock link. This measure is intended to protect access to user data.
No unsanitized values
By default, every value entered inside a form will be sanitized with sanitizer text or array (depending on which type of input field). These sanitizers will be applied to each input unless you remove them manually. So it is guaranteed that no unsanitized value will be used.
Sending emails
This module sends a lot of emails for the communication with the user. Just to mention: if you are running a multilanguage site, the emails will always be sent in the stored user language and not in the site language. So this guarantee that the user will always get the email in his own language. If you offer a language input field inside the forms (fe registration form or profile form), the user can set his preferred language individually. If there is no language input field added, then the user language will be taken and stored from the site language used at the time of the user registration.
Activation email
This mail will be sent if a new user has registered. It contains an activation link to verify the registration.
TFA email
If TFA is enabled, this email sends the TFA code for the login. The user has to enter this code inside the login form.
Reminder email
Optional, you can send a reminder email to any user with an unverified account. This mail should remind him to activate his account. It includes the link for the activation (same as the activation email). The sending of the email will be triggered by a Hook. You can configure the time in days after which a reminder email should be sent, or you can disable the sending of the reminder email.
Password forgotten email
This mail sends a link to create new login data if the user has forgotten them. The user has to enter his email address inside the form. Then the link for entering new user data will be sent to the user.
Deletion request email
If you allow your users, that they can delete their account, this mail sends a deletion link to the user. The user has to enter his password, to get the deletion link. After clicking the link in the email, the user will be redirected to a page, where he has to enter his password again to delete the account permanently.
Deletion confirmation email
This email has nothing to do with the deletion request described before. This mail will be sent after deletion of unverified accounts. The deletion of these accounts will be triggered by a Hook. So if an account has been deleted, the user gets the information about the deletion via email. The sending of this email can be disabled inside the module configuration.
Unlock account email
If suspicious actions were detected at the login section, then the affected user account will be locked via a code inside the database. This mail contains a link to unlock the account again. The user has to click the link inside the mail, will be redirected to a page where he has to enter his password to unlock his account again. After that, the account is unlocked and the user can log in as usual.
Customizing the email texts for higher flexibility
This module adds pre-defined texts for the emails, but you are able to change them to your needs. To include activation links, codes and so on, you have to use placeholders inside your texts. Have a look at the following example:
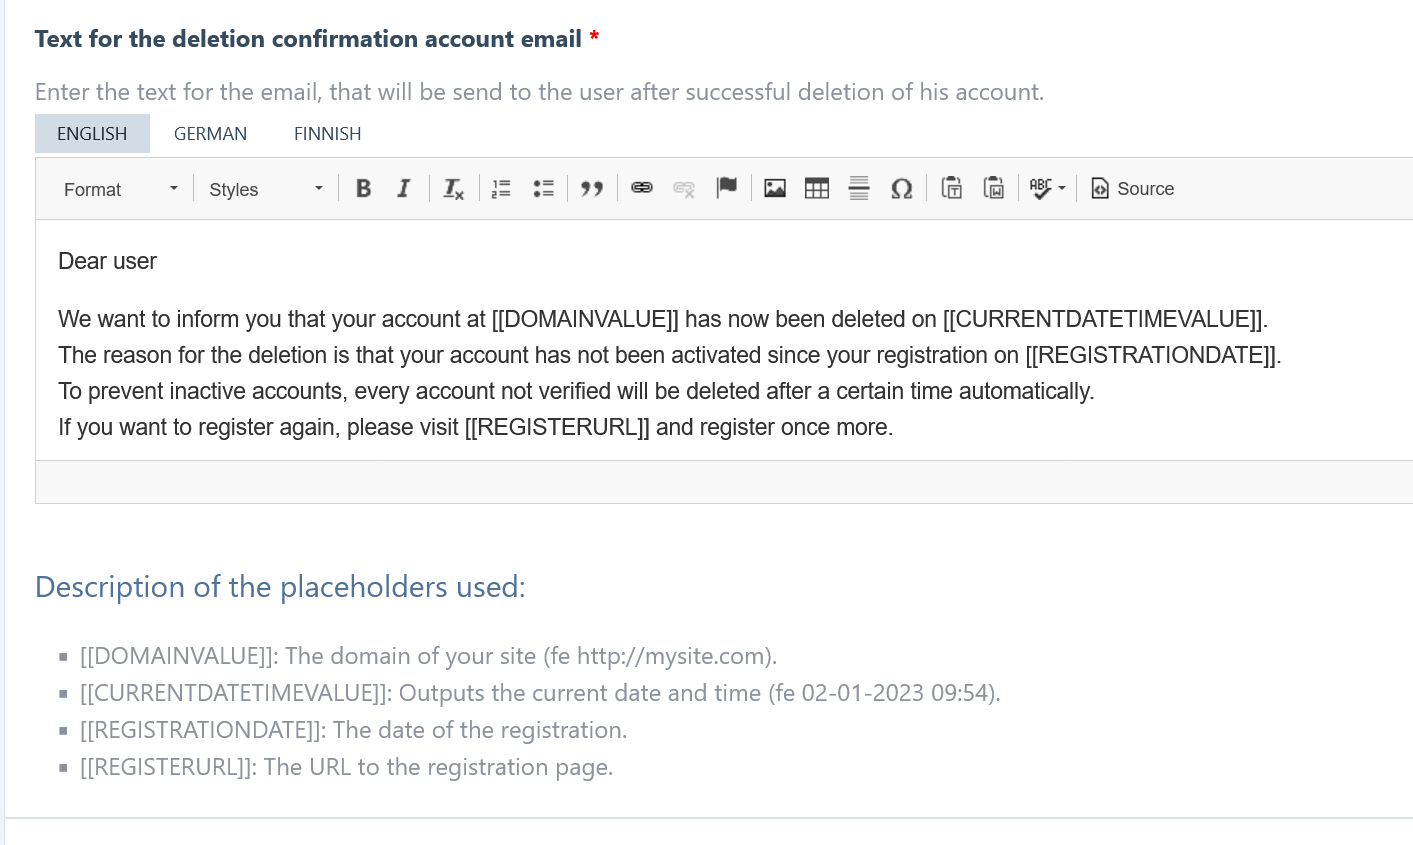
In the image above, you can see how to use the placeholders. They are surrounded by double brackets. You will find an explanation of the placeholders used under each input field.
There are also some other placeholder that can be used:
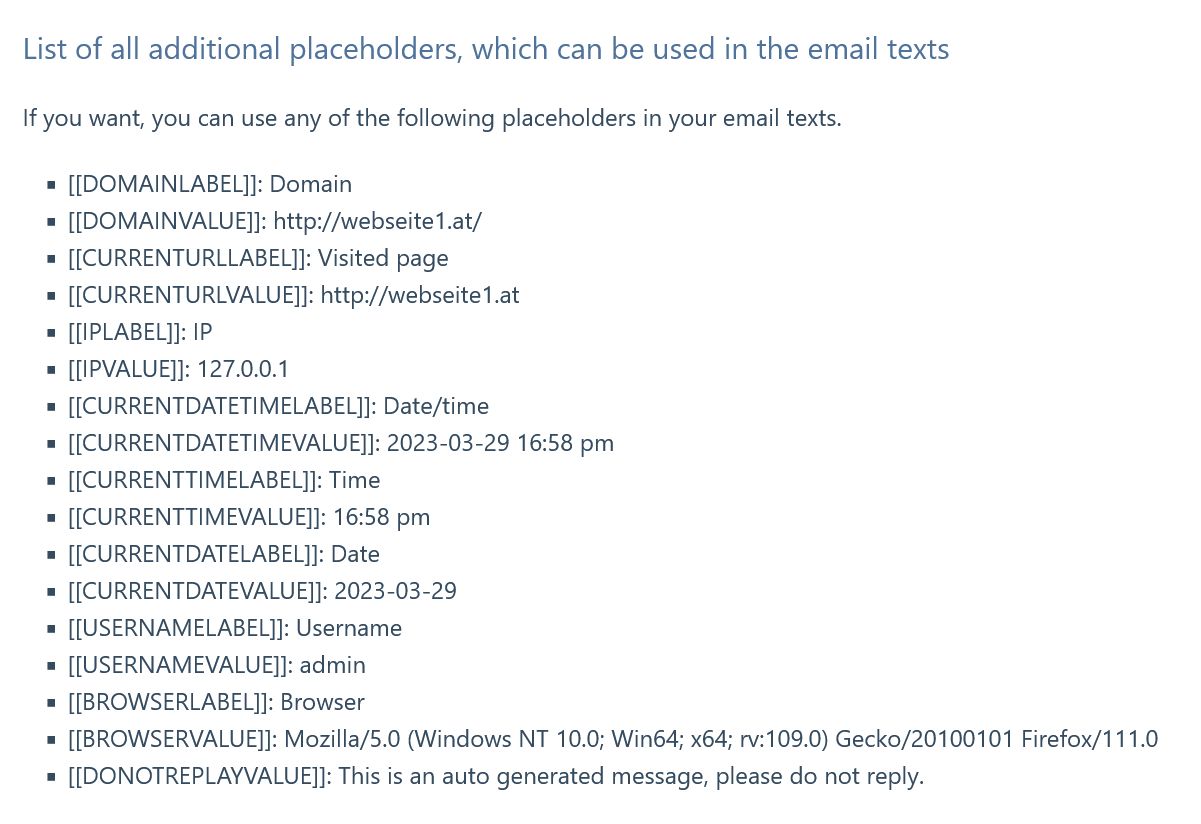
You will find this list at the bottom of the configuration page.
Support for external mail services
By default, all mails will be sent via the PHP WireMail. If you have installed on the supported external mail service, you can select to send all mails via this mail service.
For a full list of supported 3rd party mail sending modules please take a look at the list here.
Support for custom user fields
If you have added additional input fields to the user template (fe name, surname, ...), they will also be selectable for the registration and profile form on the frontend. This means, that you can add them in the module configuration to the profile or registration form, and they will be rendered on the frontend too (like email, password, ...) There is only one restriction: Only Processwire input fields of the following types will be supported at the moment:
- FieldtypeEmail
- FieldtypePassword,
- FieldtypeText
- FieldtypeTextarea
- FieldtypeCheckbox
- FieldtypeInteger
- FieldtypeFloat
- FieldtypeDatetime
- FieldtypeURL
- FieldtypePage
- FieldtypeImage
- FieldtypeCroppableImage3
All other field types will be ignored and cannot be selected.
One thing to mention about the image upload fields (FieldtypeImage, FieldtypeCroppableImage3)
Only single file upload image fields are supported (no multi-file upload). So, only image fields which allow only one file upload will be taken into account - all others will be ignored.
If you need more than 1 image for a user, you can add as many image upload fields to the profile or registration form as you want, but this image upload feature was primarily designed to offer the user to upload 1 user image.
The allowed file types of images (JPG, PNG, …) will be taken directly from the image field, so no need to set it manually. Please note: If you have created a new image field, the settings will not be stored automatically. So please save the image field at the end to save the settings too.
Afterwards you will find an example of the profile page including the user image.

In this case, first name and surname were added to the user template:
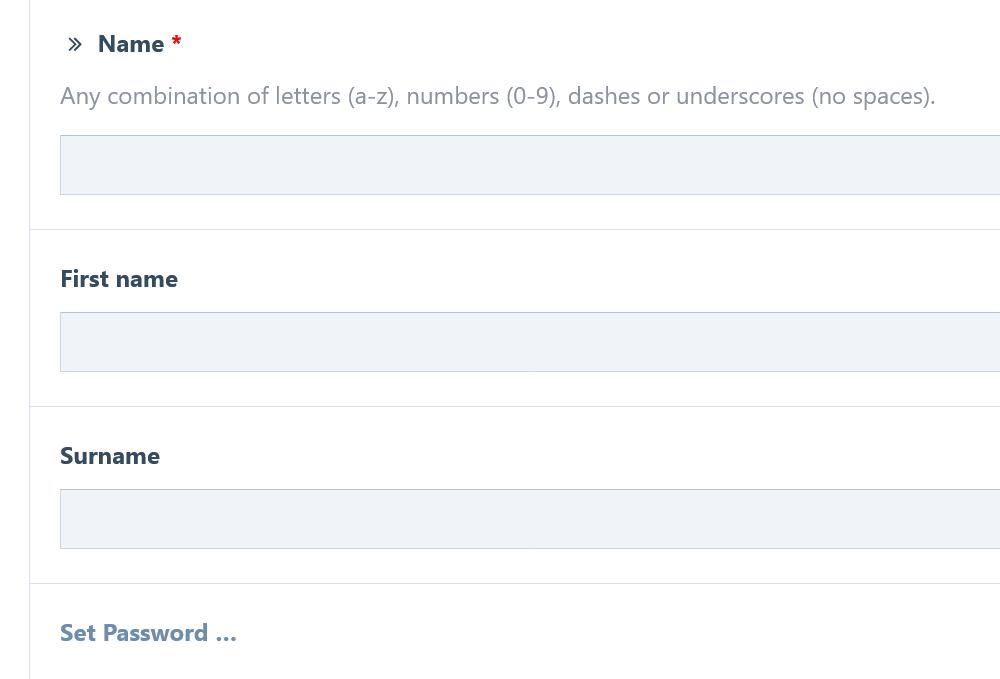
And in the configuration setting of the registration or profile form, these fields can be added as well.
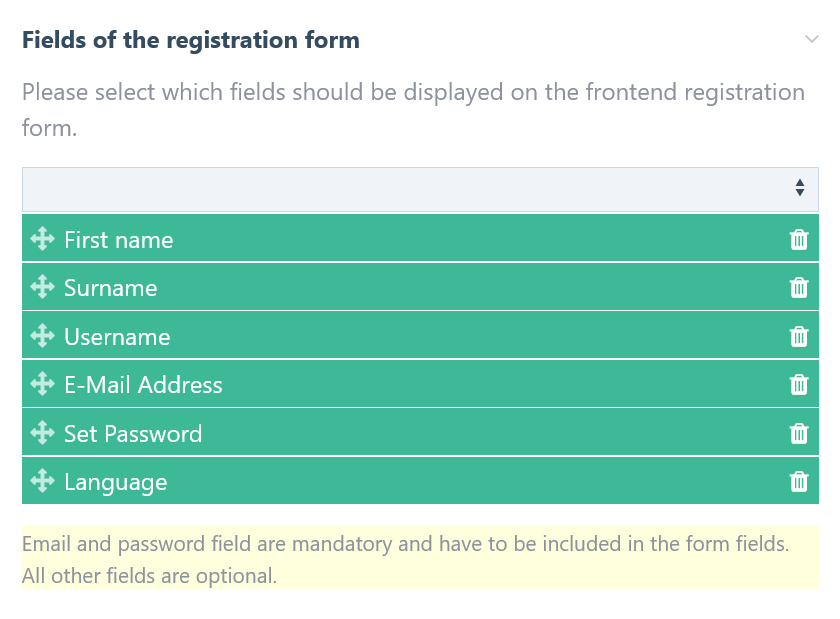
You can change the order of the fields by dragging them to the preferred position.
Just to mention: Only fields, which are editable by the user, will be displayed. Fields which are added to the user template, but the user has not the permission to edit this field will not be displayed. So if you are adding custom fields to the user template, take care that you set the status to editable.
Multi-language
The module will be shipped with the German translations (default is English). After installing a language file, all titles and descriptions in that language will be added to the pages (and to SeoMaestro fields if installed).
As an extra addition, I have added a checkbox to each language import field. This is only the case with this module. This checkbox is for importing the texts for the emails too.

If you are select fe de for the German language, and you will mark the checkbox beside this input too, then the German texts for the emails will be saved to the appropriate textareas too. But be careful, because this will overwrite all of your texts written before, but this is a real time saver.
At the moment there is unfortunately only one file for the German texts and not for other languages, but maybe other users send me some translations that I can add in the future.
Show body field content after successful form submission or not.
Every template for each page contains a body field, where you can enter some text if you want. By default, the text of the body will always be displayed on the frontend. This is ok in most cases, but sometimes you do not want to show the body text after a successful form submission, because it does not fit there. To hide the display after the form has been submitted validly, I have created a method where you can enable/disable the display of the body text, depending on the form submission status.
echo $form->setPrependBody(true); // true or false
- true: the body text will be appended to the form and is no longer visible after successful form submission
- false: the body text will not be appended to the form and is always visible (default)
If you want to change the visibility on a specific page, you can use this method inside the template. Have a look at the example below, where this behaviour will be changed on the registration page:
// This is the code of the fl_registerpage.php which includes the registration form
            echo '<div id="content">';
            $form = $modules->get('FrontendLoginRegister')->RegisterPage();
            $form->setPrependBody(true);
            echo $form->render();
            echo '</div>';
This can be done on any template!
Please note: This will only have an effect if the form will not be displayed after a successful form submission. If the form is still visible (like in the profile page), this will not work. It also does not have an effect, if a redirection was set.
Just to mention: On the "Unlock your account" page, I have set "prependBody" by default to true, because it fits better, in my opinion, with the body text. If you disagree with me, you can set it to false inside the template, as described above.
Restrictions
- Only TfaEmail can be used for the TFA
- Mails will only be sent with WireMail class
- Remember me function not implemented due to possible security issues
ToDo
- Testing, testing, testing....
- Testing, testing, testing....
This read me file will be extended time after time - so please be patient ;-)